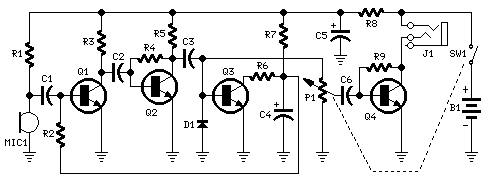
Amplified Ear
Useful to listen in faint sounds
1.5V Battery operation

Parts:
P1_____________22K Log. Potentiometer (see Notes)
R1,R9__________10K 1/4W Resistors
R2______________1M 1/4W Resistor
R3______________4K7 1/4W Resistor
R4,R7_________100K 1/4W Resistor
R5______________3K9 1/4W Resistor
R6______________1K5 1/4W Resistor
R8_____________100R 1/4W Resistor
C1,C2_________100nF 63V Polyester or Ceramic Capacitors
C3,C6___________1ВµF 63V Polyester or Ceramic Capacitors
C4_____________10ВµF 25V Electrolytic Capacitor
C5____________470ВµF 25V Electrolytic Capacitor
D1___________1N4148 75V 150mA Diode
Q1,Q2,Q3,_____BC547 45V 100mA NPN Transistors
Q4____________BC337 45V 800mA NPN Transistor
MIC1__________Miniature electret microphone
SW1____________SPST Switch (Ganged with P1)
J1_____________Stereo 3mm. Jack socket
B1_____________1.5V Battery (AA or AAA cell etc.)
Device purpose:
This circuit, connected with 32 Ohms impedance mini-earphones, can detect very remote sounds. Useful for theatre, cinema and lecture goers: every word will be clearly heard. You can also listen to your television set at a very low volume, avoiding to bother relatives and neighbours. Even if you have a faultless hearing, you may discover unexpected sounds using this device: a remote bird twittering will seem very close to you.
Circuit operation:
The heart of the circuit is a constant-volume control amplifier. All the
signals picked-up by the microphone are amplified at a constant level of about 1
Volt peak to peak. In this manner very low amplitude audio signals are highly
amplified and high amplitude ones are limited. This operation is accomplished by
Q3, modifying the bias of Q1 (hence its AC gain) by means of R2.
A noteworthy feature of this circuit is 1.5V battery operation.
Typical current drawing: 7.5mA.
Notes:
- Due to the constant-volume control, some users may consider P1 volume control unnecessary. In most cases it can be omitted, connecting C6 to C3. In this case use a SPST slider or toggle switch as SW1.
- Note the stereo output Jack socket (J1) connections: only the two inner connections are used, leaving open the external one. In this manner the two earpieces are wired in series, allowing mono operation and optimum load impedance to Q4 (64 Ohms).
- Using suitable miniature components, this circuit can be enclosed in a very small box, provided by a clip and hanged on one's clothes or slipped in a pocket.
Title: Amplified Ear
electronic circuit
Source: www.redcircuits.com
Published on: 2005-02-01
Reads: 1793
Print version: ![]()
Other electronic circuits and schematics from Audio
-
Digital Volume Control
-
25W Mosfet audio amplifier
-
Loudspeaker Test Box
-
Portable Headphone Amplifier
-
Band 2 Preamplifier
-
Minimalist Discrete Hi-Fi Preamp
-
5 band graphic equalizer using a single IC/chip
-
3 Line Mixer
-
Two way cross-over 3500 Hz
-
22W Stereo Amplifier
