Capacitance Meter
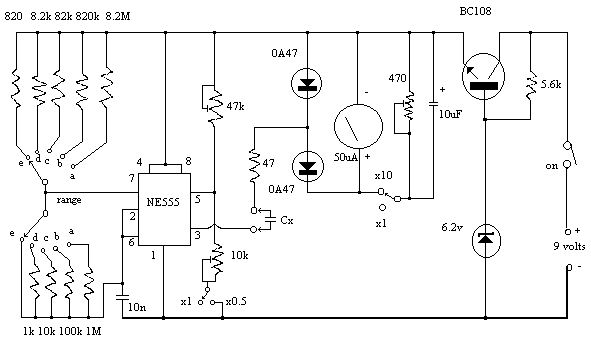
| Position | Range | Use X10 switch to measure up 10uf. Use X0.5 switch for better readings on low values. |
| a | 1 uf | |
| b | 100 nf | |
| c | 10 nf | |
| d | 1 nf | |
| e | 100 pf |
This project is more complex than the others described earlier. However, when
finished, you will have an instrument capable of measuring all but the largest
capacitors used in radio circuits. Unlike variable resistors, most variable
capacitors are not marked with their values. As well, the markings of capacitors
from salvaged equipment often rub off. By being able to measure these unmarked
components, this project will prove useful to the constructor, vintage radio
enthusiast or antenna experimenter.
The common 555 timer IC forms the heart of the circuit (Figure Three). Its
function is to charge the unknown capacitor (Cx) to a fixed voltage. The
capacitor is then discharged into the meter circuit. The meter measures the
current being drawn through the 47 ohm resistor. The 555 repeats the process
several times a second, so that the meter needle remains steady.
The deflection on the meter is directly proportional to the value of the unknown
capacitor. This means that the scale is linear, like the voltage and current
ranges on an analogue multimeter.
The meter has five ranges, from 100pF to 1uF, selected by a five position two
pole switch. In addition, there is a x10 switch for measuring higher values and
a divide-by-two facility to allow a better indication on the meter where the
capacitor being measured is just above 100, 1000pF, 0.01, 0.1 or 1 uF.
Component values are critical. For best accuracy, it is desirable that the nine
resistors wired to the Range switch have a 2% tolerance. If 0A47 diodes are not
available, try OA91 or OA95 germanium diodes instead. Construct the meter in a
plastic box; one that is about the size of your multimeter but deeper is ideal.
The meter movement should as large as your budget allows; you will be using it
to indicate exact values. A round 70mm-diameter movement salvaged from a piece
of electronic equipment was used in the prototype. The meter you buy will have a
scale of 0 to 50 microamps. This scale needs to be converted to read 0 to 100 (ie
20, 40, 60, 80, 100 instead of 10, 20, 30, 40, 50). Use of white correction
fluid or small pieces of paper will help here.
The components can be mounted on a piece of matrix board or printed circuit
board. Use a socket for the IC should replacement ever be needed. Keep wires
short to minimise stray capacitance; stray capacitance reduces accuracy.
Calibrating the completed meter can be done in conjunction with a ready-built
capacitance meter. Failing this, a selection of capacitors of known value, as
measured on a laboratory meter, could be used. If neither of these options are
available, simply buy several capacitors of the same value and use the one which
is nearest the average as your standard reference. Use several standards to
verify accuracy on all ranges.
To calibrate, disable both the x10 and divide-by-two functions (ie both switches
open). Then connect one of your reference capacitors and switch to an
appropriate range. Vary the setting of the 47k trimpot until the meter is
reading the exact value of the capacitor. Then switch in the divide-by-two
function. This should change the reading on the meter. Adjust the 10k trimpot so
that the needle shows exactly twice the original reading. For example, if you
used a 0.01 uF reference, and the meter read 10 on the 0.1 uF range, it should
now read 20. Now switch out the divide-by-two function.
If you are not doing so already, change to a reference with a value equal to one
of the ranges (eg 1000pF, 0.01uF, 0.1uF etc). Switch to the range equal to that
value (ie the meter reads full-scale (100) when that capacitor is being measured.
Switching in the x10 function should cause the meter indication to drop
significantly. Adjust the 470 ohm trimpot so that the meter reads 10. Move down
one range (eg from 0.01uF to 1000pF). The meter should read 100 again. If it
does not, vary the 470 ohm trimpot until it does. That completes the calibration
of the capacitance meter. Now try measuring other components to confirm that the
measurements are reasonable.
With care, an accuracy of five percent or better should be possible on most
ranges.
![]() Also check the conversation about this project at the community. Post you
questions here.
Also check the conversation about this project at the community. Post you
questions here.
Title: Capacitance Meter
electronic circuit
Source: www.electronics-lab.com
Published on: 2005-02-10
Reads: 1944
Print version: ![]()
Other electronic circuits and schematics from Test and measurement
-
Digital Voltmeter
-
Contactless Mains Voltage Indicator
-
Led display digital Voltmeter
-
Oscilloscope testing module (huntron circuit)
-
AC Line Current Detector
-
Triangle / Squarewave Generator
-
Latching Continuity Tester
-
XTal Tester
-
Linear Resistance Meter
-
Voltage follower with 1G ohm input resistance