Cuckoo sound Generator
Agreeable, very close sound imitation
Suitable for sound effects, door-bells etc.
Parts:
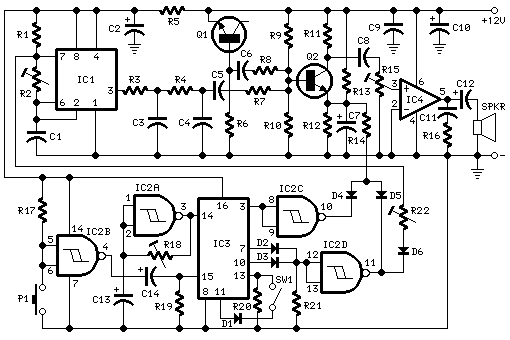
R1,R5___________1K 1/4W Resistors
R2_____________50K 1/2W Trimmer Cermet
R3______________8K2 1/4W Resistor
R4_____________82K 1/4W Resistor
R6______________1M 1/4W Resistor
R7,R17,R20,R21_22K 1/4W Resistors
R8,R10,R11,R19_10K 1/4W Resistors
R9____________150K 1/4W Resistor
R12_____________4K7 1/4W Resistor
R13___________100K 1/4W Resistor
R14___________220R 1/4W Resistor
R15,R22________20K 1/2W Trimmers Cermet
R16____________10R 1/4W Resistor
R18___________200K 1/2W Trimmer Cermet
C1,C11_________47nF 63V Polyester or Ceramic Capacitors
C2,C10,C12____220ВµF 25V Electrolytic Capacitors
C3____________220nF 63V Polyester or Ceramic Capacitor
C4_____________22nF 63V Polyester or Ceramic Capacitor
C5,C6,C8,C9___100nF 63V Polyester or Ceramic Capacitors
C7,C13,C14_____10ВµF 63V Electrolytic Capacitors
D1,D2,D3,D6__1N4148 75V 150mA Diodes
D4,D5_________BAT46 100V 150mA Schottky-barrier Diodes
Q1,Q2_________BC547 45V 100mA NPN Transistors
IC1____________7555 or TS555CN CMos Timer IC
IC2____________4093 Quad 2 input Schmitt NAND Gate IC
IC3____________4017 Decade counter with 10 decoded outputs IC
IC4___________LM386 Audio power amplifier IC
P1_____________SPST Pushbutton
SW1____________SPST Switch
SPKR___________8 Ohm Loudspeaker
Comments:
This circuit generates a two-tone effect very much alike the cuckoo sound. It
can be used for door-bells or other purposes thanks to a built-in audio
amplifier and loudspeaker
Used as a sound effect generator it can be connected to external amplifiers,
tape recorders etc. In this case, the built-in audio amplifier and loudspeaker
may be omitted and the output taken from C8 and ground.
There are two options: free running, when SW1 is left open, and one-shot, when
SW1 is closed. In this case a two-tone cuckoo sound will be generated each time
P1 pushbutton is pressed.
Circuit operation:
IC1 is wired as a squarewave generator and produces both tones of the cuckoo
sound. The frequency of the higher one (667Hz) is set by means of Trimmer R2.
When IC2D output goes low, a further Trimmer (R22) is added to IC1 timing
components via D6, and the lower tone (545Hz) is generated.
To imitate closely the cuckoo sound, the squarewave output of IC1 is converted
to a quasi-sinusoidal waveform by R3, R4, C3 and C4, then mixed with the white
noise generated by Q1, R6.
Q2 has two purposes: it mixes the two incoming signals and gates the resulting
tone, shaping its attack and decay behavior by means of the parts wired around
its Emitter.
IC4 is the audio power amplifier driving the speaker and R15 is the volume
control.
The various sound and pause timings for the circuit are provided by the clock
generator IC2A driving the decade counter IC3. Some output pins of this IC are
gated by IC2C, IC2D and related components to drive appropriately the sound
generator and the sound gate.
When SW1 is left open the circuit operates in the free-running mode and a cuckoo
sound is generated continuously. When SW1 is closed, the circuit generates two
tones then stops, because a high state appears at the last output pin (#11) of
the decade counter IC: therefore the count is inhibited by means of D1 feeding
pin #13.
The circuit is reset by a positive pulse at pin #15 of IC3 when P1 is pressed.
Setup:
Best results will be obtained if the two tones frequencies are set precisely, i.e. 667Hz for the first tone and 545Hz for the second: in musical terms this interval is called a Minor Third. Obviously a digital frequency counter, if available, would be the best tool to setup R2 and R22, but you can use a musical instrument, e.g. a piano or guitar, tuning-up the notes accurately by ear.
- Disconnect temporarily R22 from D6 anode
- Connect the digital frequency counter to pin 3 of IC1
- Adjust R2 in order to read 667Hz on the display
- Connect R22 to negative ground and adjust it to read 545Hz on the display
- Restore R22 - D6 connection
Tuning by ear:
- Disconnect temporarily R22 from D6 anode
- Disconnect C8 from Q2 Collector and connect it to R4, C4 and C5 junction
- Adjust R2 in order that the tone generated by the loudspeaker is at the same pitch of the reference note generated by your musical instrument. This reference note will be the E written on the stave in the fourth space when using the treble clef
- Connect R22 to negative ground and adjust it in order that the tone generated by the loudspeaker is at the same pitch of the reference note generated by your musical instrument. This second reference note will be the C-sharp written on the stave in the third space when using the treble clef
- Restore R22 - D6 and C8 to Q2 Collector connections
Notes:
- The master clock can be adjusted by means of R18.
- The percentage of hiss and sound in the mixing circuit, setting the tone character, can be varied changing R8 and R7 values respectively.
- Any kind of dc voltage supply in the 12 - 15V range can be used, but please note that supply voltages below 12V will prevent operation of the white noise generator.
- An amusing application of this circuit is to use a photo-resistor in place of P1, then placing the unit near the flashing lamps of your Christmas tree. A sweet cuckoo sound will be heard each time the lamp chosen will illuminate.
Title: Cuckoo sound Generator
electronic circuit
Source: www.redcircuits.com
Published on: 2005-02-10
Reads: 1493
Print version: ![]()
Other electronic circuits and schematics from Miscellaneous
-
Ultrasonic Pest Repeller
-
Pot plant water tester
-
Digital Step-Km Counter
-
Programmable Digital Code Lock
-
7 Segment LED Counter
-
Economy radar detector
-
Economical Pump Controller
-
Time Delay Relay
-
Time Delay Relay II
-
One-IC two-tones Siren